A new version of OpenCV has been released so… Time to update!
Table Of Content
(This is an updated version of the article I wrote months ago: Installing and using OpenCV 3.2 with Eclipse and MinGW on Windows 10. )
Getting started
– You will need:
- OpenCV source code: version 3.4 or 3.3 (Link to Github repository (Latest release: 3.4.3));
- (Optional) If you want the extra modules, you will need opencv_contrib (Version 3.4.3 can be found here)
- Download MinGW-w64 and extract;
- Download and install CMake.
Configuring OpenCV
- Add MinGW to System Path
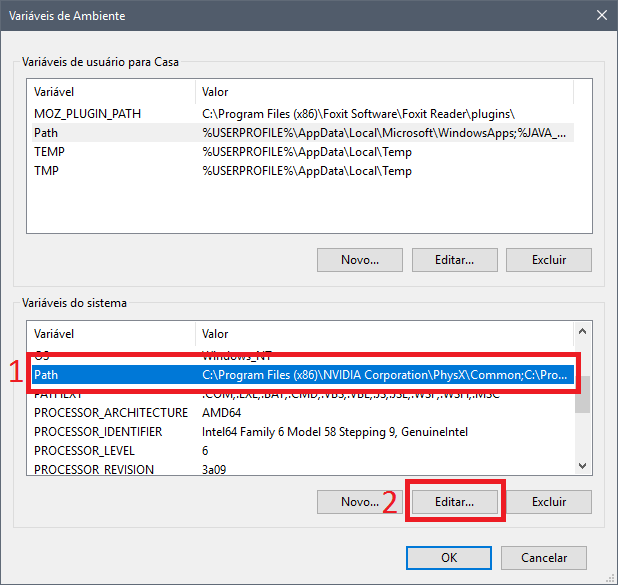
– Edit your System Environment variables (you can search for Environment in Windows’ Start Menu) ;
– Click on Path, and Edit;
– Then, hit New, and add the address of your MinGW bin folder.
- Extract OpenCV to a folder, rename it opencv_src- Inside it, create a folder named Mingw_build
Now, let’s compile OpenCV
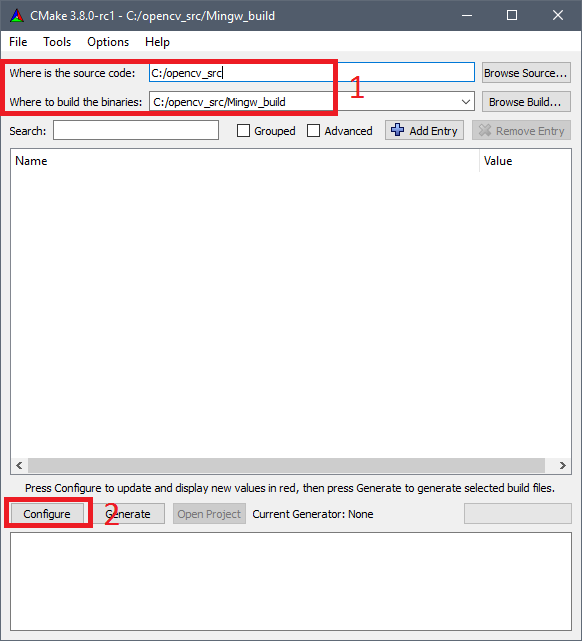
- Open CMake-gui;
- Set “Where is the source code:” to opencv_srcand “Where to build the binaries” to opencv_src/Mingw_build/
- Click on Configure, choosing Eclipse CDT4 – MinGW MakeFilein the next window, then next;
Optional Step: OpenCV_Contrib Extra modules
- If you want a simple and flawlessly working installation, just skip this step and go to the next, it’s not obligatory for you to have opencv_contrib.
- For additional info, access its Modules Github Page.
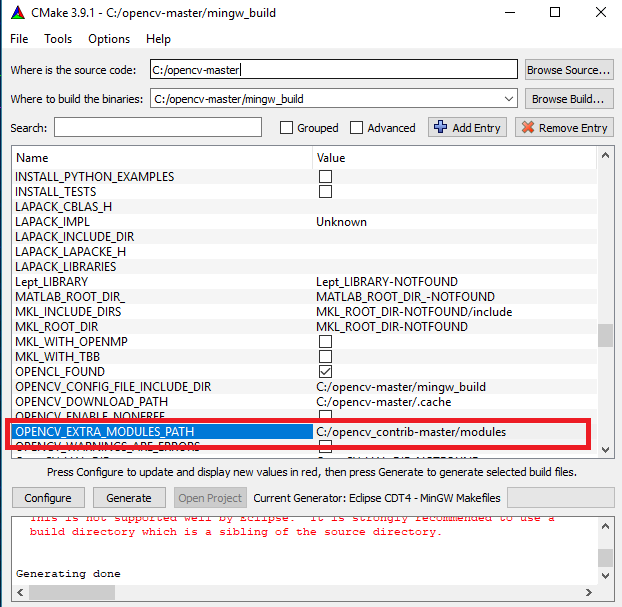
- After the “Configure” is finished, Set OPENCV_EXTRA_MODULES_PATH to opencv_contrib/modules folder
Building and Installing
- After the “Configure”, on my PC I had to deselect the options ENABLE_PRECOMPILED_HEADERS and BUILD_opencv_python3 to correctly compile.
- Hit “Generate”;
- Now, open the CMD/PowerShell, and navigate to opencv_src/Mingw_build/
- Inside opencv_src/Mingw_build type mingw32-make and hit enter;- This step probably will take a while, wait until it’s finished.
- Install using mingw32-make install
- Finally, add C:\opencv_src\Mingw_build\install\x64\mingw\binto your system path.
- I have seen errors related also to the following parameters: WITH_PTHREADS_PF , WITH_OPENCL and ENABLE_CXX11 options. Try unchecking then if something occurs.
Configuring Eclipse
- Open it and create a C++ program using the following OpenCV example:
1 2 3 4 5 6 7 8 9 10 11 12 13 14 15 16 17 18 19 20 21 22 23 24 25 26 27 28 29 30 | #include <opencv2/core/core.hpp> #include <opencv2/highgui/highgui.hpp> #include <iostream> using namespace cv; using namespace std; int main( int argc, char** argv ) { if( argc != 2) { cout <<" Usage: thisprogramname.exe ImageToLoadAndDisplay" << endl; return -1; } Mat image; image = imread(argv[1], CV_LOAD_IMAGE_COLOR); // Read the file if(! image.data ) // Check for invalid input { cout << "Could not open or find the image" << std::endl ; return -1; } namedWindow( "Display window", WINDOW_AUTOSIZE );// Create a window for display. imshow( "Display window", image ); // Show our image inside it. waitKey(0); // Wait for a keystroke in the window return 0; } |
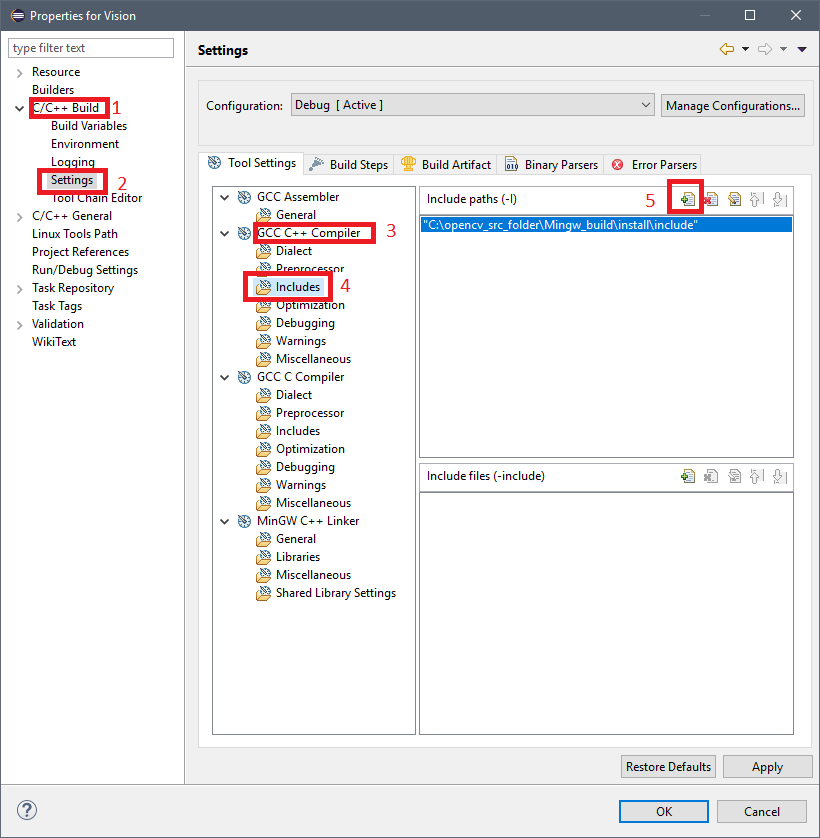
- Go to
Project > Properties > C/C++ Build > Settings > GCC C++ Compiler > Includes
and add the source OpenCV folderC:\opencv_src\Mingw_build\install\include
- Go to
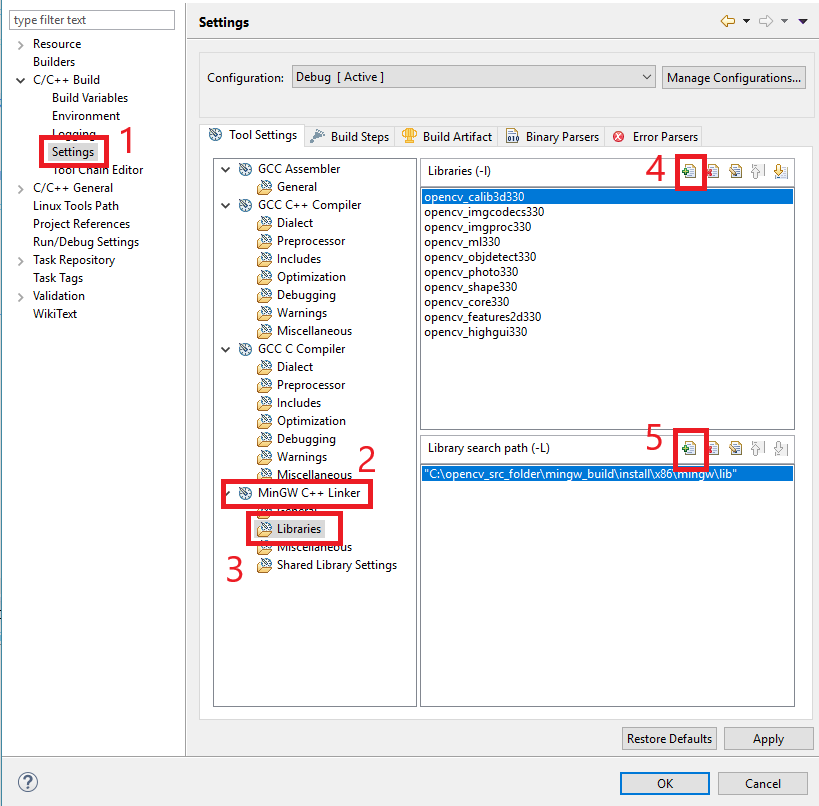
Project > Properties > C/C++ Build > Settings > MinGW C++ Linker > Libraries
, and add this to the Libraries (-l), separately as shown in the image - For OpenCV 3.4:
1 | opencv_calib3d340 opencv_core340 opencv_features2d340 opencv_flann340 opencv_highgui340 opencv_imgcodecs340 opencv_imgproc340 opencv_ml340 opencv_objdetect340 opencv_photo340 opencv_shape340 |
- For OpenCV 3.3:
1 | opencv_calib3d330 opencv_core330 opencv_features2d330 opencv_flann330 opencv_highgui330 opencv_imgcodecs330 opencv_imgproc330 opencv_ml330 opencv_objdetect330 opencv_photo330 opencv_shape330 |
- If you are using a different OpenCV version, change the number at end of each lib to match your version
- You can add additional libraries from lib folder if you need, just follow the presented format;
- Add
C:\opencv_src\Mingw_build\install\x64\mingw\lib
to Library search path (-L); - Build the project. There are a lot of o ways of running it, e.g.:
- Open the Powershell or CMD, go to the executable folder and type:
yourprogramname.exe image.jpg - Or put the path of the image you want to show in the code, changing the following line:
- image = imread(argv[1], CV_LOAD_IMAGE_COLOR);
to - image = imread("C://YOURIMAGEPATH.jpg", CV_LOAD_IMAGE_COLOR);
- image = imread(argv[1], CV_LOAD_IMAGE_COLOR);
- Open the Powershell or CMD, go to the executable folder and type:
- Updates
04/11/17 – Changed the order of some steps;
22/11/17 – Added MinGW-w64 instead of the conventional MinGW;
11/01/18 – Added support to OpenCV 3.4
12/04/18 – Added a better explanation for running the test code
12/09/18 – Added version 3.4.3 links and error correction sentences
Have fun with your projects!
If this post helped you, please consider buying me a coffee 🙂


I tried with changing the path, doesn’t help still with same progress 🙁
Hi Jean,
I tried lots of options, I added ffmpeg_64.dll into my c++ settings. Still my videocapture is not working with opencv 3.4.0.
Is any configuration am i missing with still…?
I tried this code here on my pc and worked just fine:
#include "opencv2/objdetect/objdetect.hpp"#include "opencv2/imgproc/imgproc.hpp"
#include "opencv2/highgui/highgui.hpp"
#include
using namespace cv;
using namespace std;
int main(int argc, char* argv[])
{
//open the video file for reading
VideoCapture cap("E:\\Downloads\\FMAB_Ridler182_GOM_01.mkv");
// if not success, exit program
if (cap.isOpened() == false)
{
cout <<"Cannot open the video file"; cin.get(); //wait for any key press return -1; } else { cout << "Success"; } }
Try the following steps: (you might have already tried them, but I suggest you following it again with attention)
1 - Check if your
C:\opencv\install\x64\mingw\binfolder has a file namedopencv_ffmpeg340_64.dll. If not, try recompiling your OpenCV with the option WITH_FFMPEG checked in CMake;2 - Confirm if your
C:\opencv\install\x64\mingw\binis added to your system PATH (The SYSTEM path not only for the USER);3 - Check if
C:\opencv\install\x64\mingw\binis added on your Project's Library Search Path (Project > Properties > C/C++ Build > Settings > MinGW C++ Linker > Libraries).Hi Jean,
I found that there is no opencv_ffmpeg340_64.dll is not there in the D:\Personal\opencv_3.4\opencv\mingw_build_3.4\install\x64\mingw\bin folder.
I reconfigured the cmake, but its till not generating into that folder.
Did you see any OpenCV compiling/configuring/installing errors or warnings related to opencv_ffmpeg ? If yes, could please post them?
Line 396: FFMPEG: Download: opencv_ffmpeg_64.dll
Line 396: FFMPEG: Download: opencv_ffmpeg_64.dll
Line 404: FFMPEG: Download failed: 6;”Couldn’t resolve host name”
Line 411: 3rdparty/ffmpeg/ffmpeg.cmake:20 (ocv_download)
Line 411: 3rdparty/ffmpeg/ffmpeg.cmake:20 (ocv_download)
Line 412: cmake/OpenCVFindLibsVideo.cmake:218 (download_win_ffmpeg)
Well, let’s try something manual then.
1 – Download opencv_ffmpeg_64.dll, opencv_ffmpeg.dll , and ffmpeg_version.cmake from https://github.com/opencv/opencv_3rdparty/tree/ffmpeg/master_20170418/ffmpeg
2 – Delete your older OpenCV source folder and re-extract the files
3 – Now, you will manually create the folders C:\opencv-3.4.0\.cache\ffmpeg
5 – Paste opencv_ffmpeg_64.dll, opencv_ffmpeg.dll , and ffmpeg_version.cmake inside the folder you just created ( C:\opencv-3.4.0\.cache\ffmpeg)
6 – Go to C:\opencv-3.4.0\3rdparty\ffmpeg\ffmpeg.cmake and open it. You will see something like this in the first lines:
# Binary branch name: ffmpeg/master_20171009# Binaries were created for OpenCV: 8ac2c5d620b467d3f22802e96c88ddde6da707af
set(FFMPEG_BINARIES_COMMIT "66b1fed06cf3510235f367f96aa26da5cb234a15")
set(FFMPEG_FILE_HASH_BIN32 "3ae76b105113d944984b2351c61e21c6")
set(FFMPEG_FILE_HASH_BIN64 "cf3bb5bc9d393b022ea7a42eb63e794d")
set(FFMPEG_FILE_HASH_CMAKE "ec59008da403fb18ab3c1ed66aed583b")
[...]
Copy the hash numbers (that might be different) in front of the of FFMPEG_FILE flags and rename your files inside C:\opencv-3.4.0\.cache\ffmpeg to match the following format:
NUMBERS-fileName.dllthe opencv_ffmpeg.dll must use the FFMPEG_FILE_HASH_BIN32 hash, making its new name:
3ae76b105113d944984b2351c61e21c6-opencv_ffmpeg.dll
for opencv_ffmpeg_64 copy the value of FFMPEG_FILE_HASH_BIN64
cf3bb5bc9d393b022ea7a42eb63e794d-opencv_ffmpeg_64.dll
and finally FFMPEG_FILE_HASH_CMAKE for your your ffmpeg_version.cmake
ec59008da403fb18ab3c1ed66aed583b-ffmpeg_version.cmake
Now you are good to follow the installation tutorial. I Hope it works, Good Luck!
I tried it … now it is coming as terminated OCV.exe. Video is still unable to play.
Should i add the opencv_ffmpeg340_64.dll into project->properties->MINGW C++ Linker-> Library?
You could try, but I don’t think it will make any difference.
The problem you have been describing usually happens because of ffmpeg, and since you said that your folder doesn’t have it, that may be something related to your CMake/Network.
What about trying OpenCV 3.3/3.2/3.0 or even another CMake version? (Here I have been using 3.9.1)
Hello again Sir..im able to build opencv3.4 with contrib module but when im trying to add it to my Netbeans project im getting this error:
Excep
tion in thread “main” java.lang.UnsatisfiedLinkError: no opencv_340 in java library path
I tried to add the path of the generated libopencv_340.dll in the vm options of my project and im still getting this error..i already follow the solutions provided in the blog of Mr.Zamrath Nizam..what should i do..Thank you
Have you tried this one https://www.codeproject.com/Tips/717283/How-to-use-OpenCV-with-Java-under-NetBeans-IDE ?
Yes Sir i have already tried it, still it doesn’t resolve the error, and im just confused why im my build directory there are two libopencv_340.dll first is in the bin folder and the other one is in the install folder in java subdirectory..Which file shoud i use.Thank you again.
All the files needed for installation are copied from your source folder to your installation folder. So, they are the same, however, you must use the one inside the Install folder.
Sir it still occurs..can you provide me a zip file of opencv with extra modules that works perfectly..i really need it..Thanks just send it to my email at [email protected]..thank you
while building the files, dnn module showed an error relating to temp in my system. Then in Cmake, i deselected the build_opencv_dnn, it worked even with opencv_contrib.
Hi,
Glad it worked for you! Thank you for the additional info.
The only problem is… Well, you won’t be capable of using dnn if you need it.
Hi,
I got an error after running mingw32-make. The error photo is in the link
https://drive.google.com/open?id=1zOWbPAGXS9mNBO2RjAQHh0HU25fXDnlu
Thank You,
Hi
1 – Go to OpenCV source folder
2 – Go to Cmake Folder
3 – Locate the file named “OpenCVCompilerOptions.cmake”
4 – Comment the line
add_extra_compiler_option(-Werror=non-virtual-dtor)So it should become
#add_extra_compiler_option(-Werror=non-virtual-dtor)5 – Configure and generate again
Hi Jean,
Build and compile appear ok. Need a test image, how do I?
Usage: display_image ImageToLoadAndDisplay
Hi,
Is everything working properly now?
Yes —
To make it work, I had to add the pointer to file_path and the include that in the location of argv:
char* file_path = “C://marble_win_development//x64_opencv_test//src//Lenna.jpg”;
Mat image;
image = imread(file_path, CV_LOAD_IMAGE_COLOR);
Did I miss the point here? I’m mainly a int main(){} guy, so the int main( int argc, char** argv ) drives me batty : )
Did I make unnecessary adjustments? I tried as is with Jenna.jpg in the source file folder with main.cpp, but wouldn’t show.
Well, let’s say you did, but I think that’s my fault.
I have read the tutorial again and it’s not completely clear about what you need to do to run the code properly.
Anyway, I’ll fix it, because you need to call the .exe file with the name of the image, e. g:
yourprogram.exe lenna.jpgThank you for making me notice this 🙂
All the best.
BTW, great tutorial.
closing remarks: Debug>x64_opencv_test2.exe Lenna.jpg works perfectly with yourprogram.exe lenna.jpg.
I can only get it to work with the shell by navigating to the directory. My IDE (Eclipse) has yourprogram.exe side by side in the same directory with lenna.jpg, but doesn’t work; can’t find it. That’s more my issue than yours. Later.
Hi Jean, have to reinstall, not related to your instructional. Which BIN is it?
C:\ MingW64\BIN\ or C:\MinGW64\x86_64-w64-mingw32\BIN ?? can’t recall
I mean the PATH that you said we need to add once MinGW installed.
Hi again! Hope you are doing fine.
Here I have been using: C:\mingw64\bin
Instead of calling “mingw32-make” you should add “-j” as an argument, so it will use all the available cores on your system and significantly increase the build process. You can also define the number of cores used: “mingw32-make -j4”
Hi Jean,
I have followed your instruction above, but I got the error as shown in the link below:
https://www.dropbox.com/s/nmh3itf9d7tdeqr/Error%20Message.png?dl=0
Can you please look at it and let me know how can I fix this error?
Thanks.
Hi,
Please try to compile again after unchecking all BUILD_TESTS options on the CMAKE Gui.
Hi Jean,
After disable BUILD_TEST option, I got the new error:
https://www.dropbox.com/s/b5z1zlvw0tyr2tl/Error%20Message%201.png?dl=0
Can you please to solve this issue?
Thanks.
Hi,
Now also uncheck BUILD_PERF_TESTS
Hi Jean,
It leads to another error message:
https://www.dropbox.com/s/g0b3squnl5bn69t/Error%20Message%202.png?dl=0
Please help again. Thanks.
Hi again Ganuco,
Glad you’re making progress.
I wont be home for the next few days or so, it will be somewhat difficult to search for solutions. Either way, let’s try to fix that.
By now, I suggest you to restart the entire process all over again, leaving all the EXAMPLES and TESTS directives on CMAKE unchecked.
Good luck!
I have tried to restart the entire process, but it still fail. Please let me know the new solution when you come back. Thanks.
The last line that appears before the error still related to opencv_stitching? If yes… well… try to uncheck BUILD_opencv_stitching.
A
Hi Jean,
I am still get the error:
https://www.dropbox.com/s/w0p2yvgoectym31/Error%20Message%203.png?dl=0
Please help. Thanks.
Hi Ganuco,
Try adding DCPU_DISPATCH= option to cmake. This is a known error for some CPU’s.
I do think that has been fixed on the latest versions (3.4.3, there’s a download link in the article).
So even if the cmake option does not work, switching to 3.4.3 would probably fix that.
bem completo, vou testar.
Voce sabe se é possivel usar a biblioteca sem usar o lib ou as dll? Quero portar o código para um microcontrolador ARM. Obrigado!
E aí! Sempre bom ver brasileiros por aqui!
Cara, a única experiência que eu tenho com ARM e OpenCV é para o Raspberry Pi. Para um microncontrolador seria novidade para mim, acredito eu que tenha soluções mais adequadas do que o OpenCV. ( se descobrir, me conte 🙂 )
As libs e dlls são componentes gerados por conta da compilação para Windows e de fato são essenciais para funcionar, ao menos no Windows.
é uma fase do meu projeto final, eu estou tentando rodar no pc seguindo seu tutorial, já que ja fizemos a camerar rodar como webcam(integrada com microcontrolador) numa primeira fase e meu parceiro esta tentando fazer rodar no pc mas somente incluindo os arquivos fonte da biblioteca sem compilar com o cmake, sem usar as bibliotecas estaticas ou dinamicas, isso não é possivel mesmo?
Outra coisa, eu compilei com o cmake mas nao apareceu a pasta install mas apareceu C:\opencv_src\Mingw_build\bin e C:\opencv_src\Mingw_build\win-install(que não possui a pasta bin) e dai eu travei na parte de incluir a pasta C:\opencv_src\Mingw_build\install, devo recompilar ou adiciono uma dessas pastas?