OpenCV: The “Eyes” of Artificial Intelligence
Ever wondered what is actually doing the “seeing” when your phone unlocks with your face, or when a self-driving car reads the road? OpenCV is at the core of many of those systems. It stands for Open Source Computer Vision Library, originally built by Intel back in 1999, and has since become the go-to standard for computer vision.
Table Of Content
Written in C++ at its core but with solid Python bindings, it packs over 2,500 optimized algorithms and a massive community behind it. The range of things you can build with it is surprisingly wide: on one end you have Instagram-style filters, background blurring in video calls, or face swap apps. On the other end, you have autonomous vehicles reading the road in real time, medical imaging systems detecting tumors, industrial robots doing quality control, and satellite imagery being analyzed for deforestation.
Whether you are building a weekend project or a production system, this library has something for you. Let us get into it.
Getting Your Environment Ready
OpenCV works on Windows, macOS, and Linux. The only thing you need is Python, ideally version 3.8 or newer. If you do not have it yet, just go to python.org and grab the default Python installer for your OS, no extra configuration needed, that is all you need to follow along here.
Optionally, and this is something I always do personally, you can create a virtual environment to keep this project isolated from the rest of your Python setup. It avoids the classic “it works on my machine” situation down the road. To create one:
1 | python -m venv opencv-env |
Then activate it. On macOS and Linux:
1 | source opencv-env/bin/activate |
Or if you are on Windows:
1 | opencv-env\Scripts\activate |
Once active, your terminal will show the environment name as a prefix. If you skipped this step, that is fine too, just move on to the install.
Installing OpenCV: Core vs. Extended
There are two packages you can install and they are not the same thing. The first is opencv-python, the standard build. It has everything you need for the vast majority of tasks: reading images, video capture, basic transformations, feature detection, object detection, and so on. This is what most people should start with, and it is the right default for almost everyone.
The second is opencv-contrib-python, which on top of the standard build adds extra modules that are either experimental, still maturing, or have specific licensing considerations. More advanced text detection, newer deep learning integrations, additional feature matchers, that kind of thing. Either one is a valid choice, but if you are not sure which one you need, just go with the default opencv-python. You can always switch later. Just pick one:
1 | pip install opencv-python |
And if you do need the extended build:
1 | pip install opencv-contrib-python |
Your First OpenCV Program: The “Hello World” of Computer Vision
The “Hello World” equivalent in computer vision is loading and displaying an image. It sounds simple, but it actually confirms your whole setup works: Python finds OpenCV, OpenCV reads from disk, and your system can open a window. Before anything else, let us confirm the install went through. Open your code editor of choice, whether that is VS Code, PyCharm, or just the Python shell directly, and run:
1 2 | import cv2 print(cv2.__version__) |

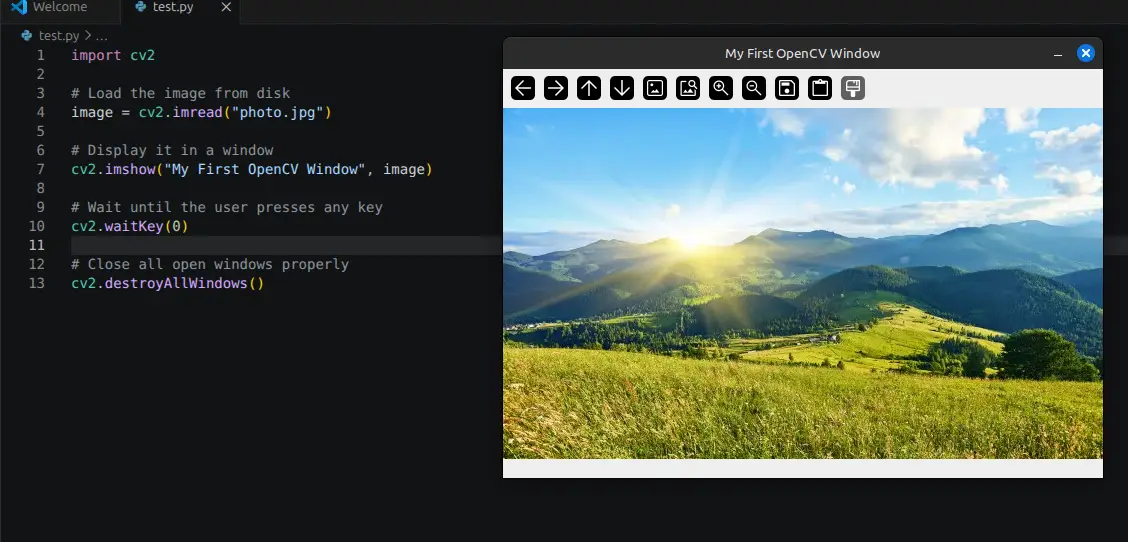
A version number like 4.x.x means you are good. If you get an error, the most likely cause is a conflicting package or the wrong environment being active. Once that is out of the way, grab any image from your computer, name it photo.jpg, and put it in the same folder as your script. Here is the full program:
1 2 3 4 5 6 7 8 9 10 11 12 13 | import cv2 # Load the image from disk image = cv2.imread("photo.jpg") # Display it in a window cv2.imshow("My First OpenCV Window", image) # Wait until the user presses any key cv2.waitKey(0) # Close all open windows properly cv2.destroyAllWindows() |
Walking through it line by line: import cv2 brings the library in. Even though we installed it as opencv-python, it is always imported as cv2, just a naming quirk from its early days.
cv2.imread() reads the image file and loads it into memory as a NumPy array. This means the image is represented as a grid of numbers, where each cell holds the pixel values for that position. A color image becomes a 3D array with shape [height, width, channels], where channels are Blue, Green, and Red in that order. Yes, BGR, not RGB. Another OpenCV quirk you will get used to quickly.
cv2.imshow() opens a window and renders the image. The cv2.waitKey(0) is crucial: without it, the window flashes and disappears before you see anything, it tells the program to hold until you press a key. Finally, cv2.destroyAllWindows() cleans everything up properly.
When Things Go Wrong
The most common issue is a silent failure from cv2.imread(). If the file path is wrong, it does not raise an exception, it just returns None, and when you try to display that you get something like (-215:Assertion failed) !_src.empty(). Nine times out of ten the fix is simple: either use the full absolute path to the file, or make sure you are running the script from the same directory where the image lives.
Windows users hitting DLL errors at import usually just need to install the Visual C++ Redistributables from Microsoft’s site. On macOS with Apple Silicon, make sure both Python and OpenCV are ARM builds, mixing architectures will give you trouble.
Where Do You Go From Here?
Getting that first image on screen is a real milestone. From here the path opens up into webcam capture, image transformations, edge and face detection, object tracking, and eventually deep learning-based pipelines. There is a lot of ground to cover, and we will be going through it step by step in the next posts.
One thing I always tell people starting out: skip the urge to read the docs cover to cover. Pick a small project you actually care about and let it pull you forward. You will learn faster that way than any other approach.
See you in the next one.
Check out the other articles in this series:
1. Installation, Setup, and Your First Computer Vision Program
2. How Images Are Represented in Computer Vision
3. Basic Image Operations You Will Use in Every Project
4. Edge Detection with Sobel and Canny


No Comment! Be the first one.