A new version of OpenCV has been released so… Time to update!
Table Of Content
(This is an updated version of the article I wrote months ago: Installing and using OpenCV 3.2 with Eclipse and MinGW on Windows 10. )
Getting started
– You will need:
- OpenCV source code: version 3.4 or 3.3 (Link to Github repository (Latest release: 3.4.3));
- (Optional) If you want the extra modules, you will need opencv_contrib (Version 3.4.3 can be found here)
- Download MinGW-w64 and extract;
- Download and install CMake.
Configuring OpenCV
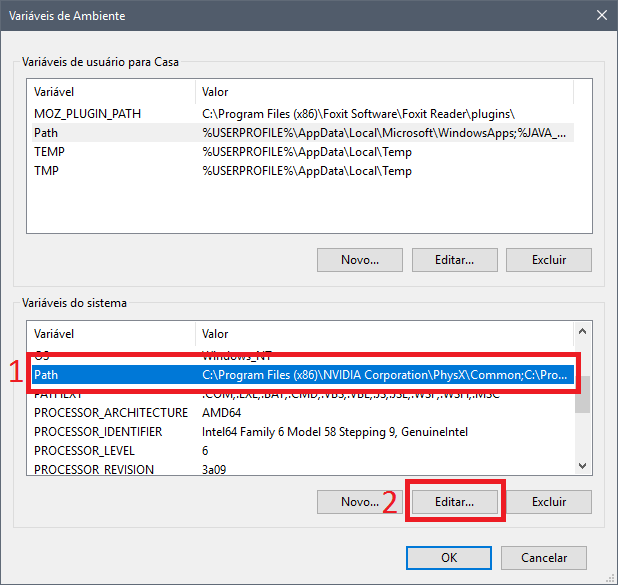
- Add MinGW to System Path
– Edit your System Environment variables (you can search for Environment in Windows’ Start Menu) ;
– Click on Path, and Edit;
– Then, hit New, and add the address of your MinGW bin folder.
- Extract OpenCV to a folder, rename it opencv_src- Inside it, create a folder named Mingw_build
Now, let’s compile OpenCV
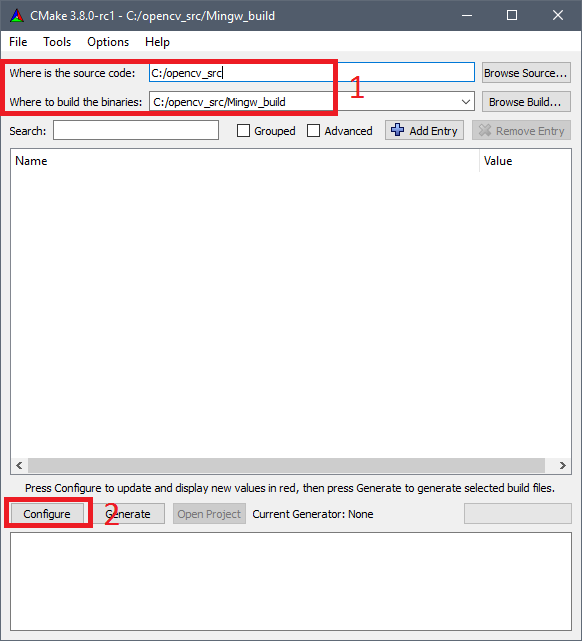
- Open CMake-gui;
- Set “Where is the source code:” to opencv_srcand “Where to build the binaries” to opencv_src/Mingw_build/
- Click on Configure, choosing Eclipse CDT4 – MinGW MakeFilein the next window, then next;
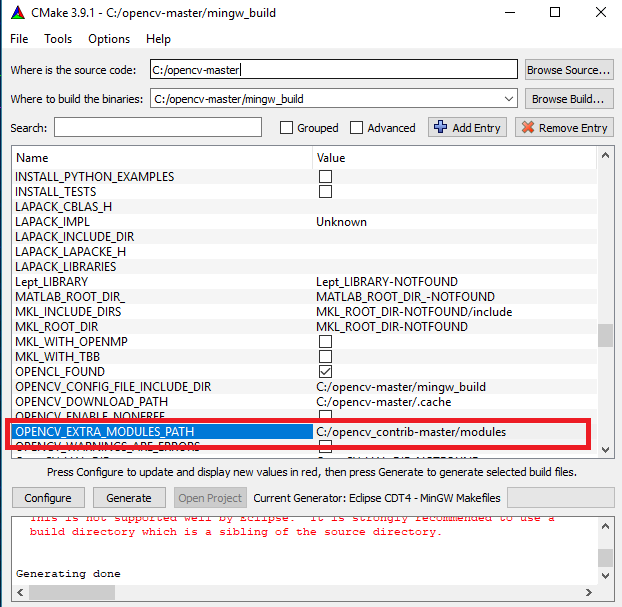
Optional Step: OpenCV_Contrib Extra modules
- If you want a simple and flawlessly working installation, just skip this step and go to the next, it’s not obligatory for you to have opencv_contrib.
- For additional info, access its Modules Github Page.
- After the “Configure” is finished, Set OPENCV_EXTRA_MODULES_PATH to opencv_contrib/modules folder
Building and Installing
- After the “Configure”, on my PC I had to deselect the options ENABLE_PRECOMPILED_HEADERS and BUILD_opencv_python3 to correctly compile.
- Hit “Generate”;
- Now, open the CMD/PowerShell, and navigate to opencv_src/Mingw_build/
- Inside opencv_src/Mingw_build type mingw32-make and hit enter;- This step probably will take a while, wait until it’s finished.
- Install using mingw32-make install
- Finally, add C:\opencv_src\Mingw_build\install\x64\mingw\binto your system path.
- I have seen errors related also to the following parameters: WITH_PTHREADS_PF , WITH_OPENCL and ENABLE_CXX11 options. Try unchecking then if something occurs.
Configuring Eclipse
- Open it and create a C++ program using the following OpenCV example:
1 2 3 4 5 6 7 8 9 10 11 12 13 14 15 16 17 18 19 20 21 22 23 24 25 26 27 28 29 30 | #include <opencv2/core/core.hpp> #include <opencv2/highgui/highgui.hpp> #include <iostream> using namespace cv; using namespace std; int main( int argc, char** argv ) { if( argc != 2) { cout <<" Usage: thisprogramname.exe ImageToLoadAndDisplay" << endl; return -1; } Mat image; image = imread(argv[1], CV_LOAD_IMAGE_COLOR); // Read the file if(! image.data ) // Check for invalid input { cout << "Could not open or find the image" << std::endl ; return -1; } namedWindow( "Display window", WINDOW_AUTOSIZE );// Create a window for display. imshow( "Display window", image ); // Show our image inside it. waitKey(0); // Wait for a keystroke in the window return 0; } |
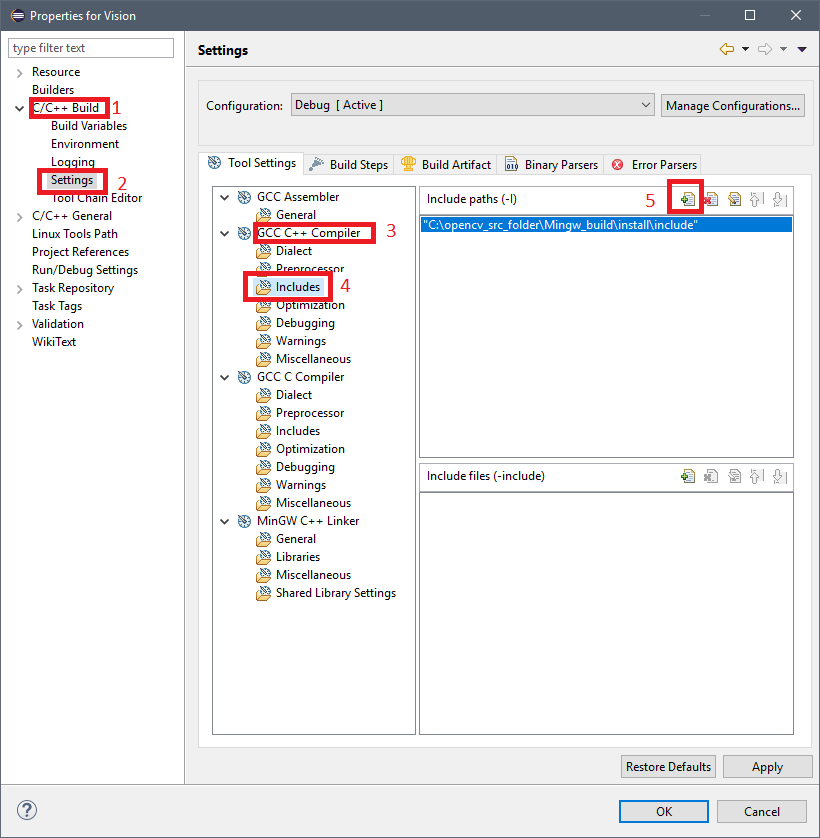
- Go to
Project > Properties > C/C++ Build > Settings > GCC C++ Compiler > Includes
and add the source OpenCV folderC:\opencv_src\Mingw_build\install\include
- Go to
Project > Properties > C/C++ Build > Settings > MinGW C++ Linker > Libraries
, and add this to the Libraries (-l), separately as shown in the image - For OpenCV 3.4:
1 | opencv_calib3d340 opencv_core340 opencv_features2d340 opencv_flann340 opencv_highgui340 opencv_imgcodecs340 opencv_imgproc340 opencv_ml340 opencv_objdetect340 opencv_photo340 opencv_shape340 |
- For OpenCV 3.3:
1 | opencv_calib3d330 opencv_core330 opencv_features2d330 opencv_flann330 opencv_highgui330 opencv_imgcodecs330 opencv_imgproc330 opencv_ml330 opencv_objdetect330 opencv_photo330 opencv_shape330 |
- If you are using a different OpenCV version, change the number at end of each lib to match your version
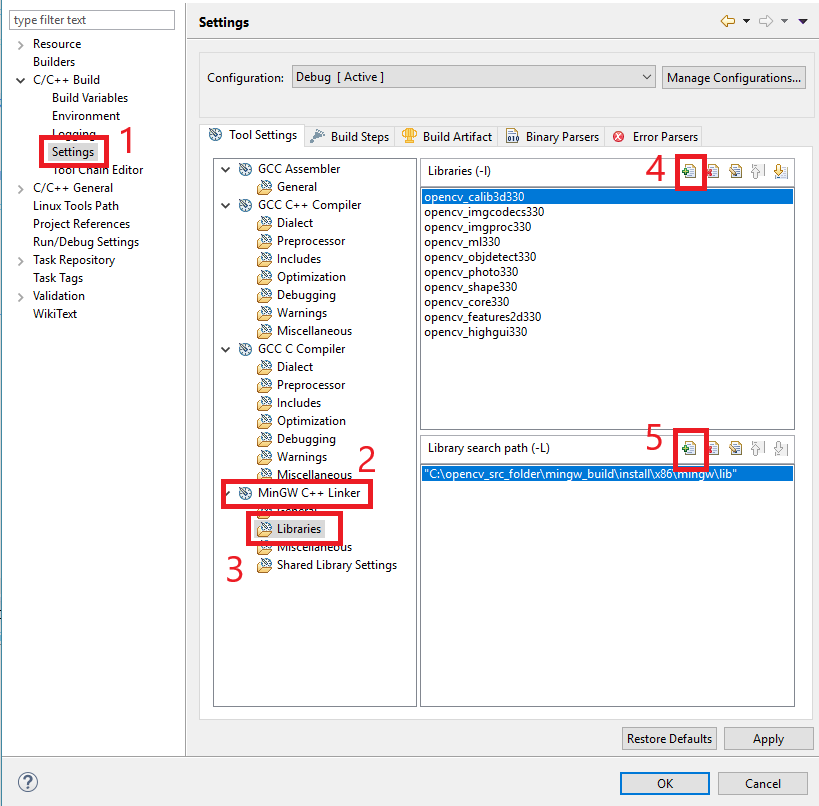
- You can add additional libraries from lib folder if you need, just follow the presented format;
- Add
C:\opencv_src\Mingw_build\install\x64\mingw\lib
to Library search path (-L); - Build the project. There are a lot of o ways of running it, e.g.:
- Open the Powershell or CMD, go to the executable folder and type:
yourprogramname.exe image.jpg - Or put the path of the image you want to show in the code, changing the following line:
- image = imread(argv[1], CV_LOAD_IMAGE_COLOR);
to - image = imread("C://YOURIMAGEPATH.jpg", CV_LOAD_IMAGE_COLOR);
- image = imread(argv[1], CV_LOAD_IMAGE_COLOR);
- Open the Powershell or CMD, go to the executable folder and type:
- Updates
04/11/17 – Changed the order of some steps;
22/11/17 – Added MinGW-w64 instead of the conventional MinGW;
11/01/18 – Added support to OpenCV 3.4
12/04/18 – Added a better explanation for running the test code
12/09/18 – Added version 3.4.3 links and error correction sentences
Have fun with your projects!
If this post helped you, please consider buying me a coffee 🙂


A pasta install nao foi criada por aqui, somenta win-install mas aparentemente sem nada dentro, somente uns arquivos do cmake, eu perdi algum passo?
Sim, ficou algum passou faltando aí, sugiro dar um double-check em tudo.
Hi, the build process without the contrib moduls worked fine, but I definitely need these extra packages.
I use mingw-w64 version 8.1.0, CMake 3.12.2, opencv 3.2 and opencv 3.4.1.
I did the installation with both opencv versions, but always got errors.
The warning in CMake is
“CMake Warning in CMakeLists.txt:
The build directory is a subdirectory of the source directory.
This is not supported well by Eclipse. It is strongly recommended to use a
build directory which is a sibling of the source directory.”
The error when I build it with mingw32-make is:
“C:\opencv_src\modules\videoio\src\cap_msmf.cpp: In instantiation of ‘void {anonymous}::ComPtr::Release() [with T = IMF2DBuffer]’:
C:\opencv_src\modules\videoio\src\cap_msmf.cpp:170:9: required from ‘HRESULT {anonymous}::ComPtr::As({anonymous}::ComPtr&) const [with U = IMF2DBuffer; T = IMFMediaBuffer; HRESULT = long int]’
C:\opencv_src\modules\videoio\src\cap_msmf.cpp:1271:17: required from here
C:\opencv_src\modules\videoio\src\cap_msmf.cpp:162:13: error: using invalid field ‘{anonymous}::ComPtr::p’
if (p)
^
C:\opencv_src\modules\videoio\src\cap_msmf.cpp:163:13: error: using invalid field ‘{anonymous}::ComPtr::p’
p.Release();
^
cc1plus.exe: some warnings being treated as errors
mingw32-make[2]: *** [modules\videoio\CMakeFiles\opencv_videoio.dir\build.make:189: modules/videoio/CMakeFiles/opencv_videoio.dir/src/cap_msmf.cpp.obj] Error 1
mingw32-make[1]: *** [CMakeFiles\Makefile2:4420: modules/videoio/CMakeFiles/opencv_videoio.dir/all] Error 2
mingw32-make: *** [Makefile:162: all] Error 2”
And can you tell me the steps for the contrib modules in detail, do I have to configure opencv first without extra packages, then add the extra modules path and configure again or just hit the generate button then?
Thank you!
Hi Mario!
This CMake warning happens because of how the folders are organized. Don’t worry about it (if you wanna change the build directory to outside the OpenCV source folder, that warning will disappear)
About the Opencv_contrib, please make sure to download the right version (the one that matches OpenCV’s). To install it, as mentioned in the tutorial, After the “Configure” is finished, Set OPENCV_EXTRA_MODULES_PATH to opencv_contrib/modules folder.
Hi Jean,
Thank you for the answer! I did it again with opencv 3.4.1 and opencv contrib 3.4.1 and followed the tutotrial steps with including the extra modules path, but again got the error at 62% of the build process.
Do you have any other tips for me? Do I have to uncheck more options in CMake or how du I have to configure the mingw installation for example?
Hi Jean,
I tried it again with opencv 3.4.3 and opencv contrib 3.4.3 and just got errors with the videoio module.
After unchecking it the build process ended with 100% success, the problem is I need the videoio module.
Do you have tips for these videoio module errors?
Hi, sorry for the delay.
Could you please show a screenshot of the error?
(I suggest you to try checking if the extra modules path is set to /opencv_contrib/modules
Also, you can try to enable/disable ENABLE_CXX11 and/or INSTALL_C_EXAMPLES)
Hi jean,
I’m having the error in the link while running mingw32-make
http://i66.tinypic.com/201gk5.png
please give me fast reply.
Thanks..!!
Hi Jean,
I am trying to use OPENCV 4.0 in eclipse,
I made configure and generate in CMake.
When i use the commmand mingw32-make with the directory path, i am facing the errors.
I have deselected the Prebuild actions and Build Python
Can you kindly help me out, Thanks in advance!
Hi Naveem,
I have not tried OpenCV 4 yet.
I will explain how to install and use it in a post very soon.
Best,
Jean.
Hi Jean,
Thanks a lot for your reply.
Waiting for your post very soon. Since i am not able to proceed further.
BR,
Naveen.
i found that when videoio module is trying to build, the build is failing.
Is it something i should download additionally or shall i exclude this module from the build.
I am posting the error from the module videoio
E:\opencv_ext_4.0\opencv\sources\modules\videoio\src\cap_msmf.cpp: In instantiation of ‘void {anonymous}::ComPtr::Release() [with T = IMF2DBuffer]’:
E:\opencv_ext_4.0\opencv\sources\modules\videoio\src\cap_msmf.cpp:175:9: required from ‘HRESULT {anonymous}::ComPtr::As({anonymous}::ComPtr&) const [with U = IMF2DBuffer; T = IMFMediaBuffer; HRESULT = long int]’
E:\opencv_ext_4.0\opencv\sources\modules\videoio\src\cap_msmf.cpp:1276:17: required from here
E:\opencv_ext_4.0\opencv\sources\modules\videoio\src\cap_msmf.cpp:167:13: error: using invalid field ‘{anonymous}::ComPtr::p’
if (p)
^
E:\opencv_ext_4.0\opencv\sources\modules\videoio\src\cap_msmf.cpp:168:13: error: using invalid field ‘{anonymous}::ComPtr::p’
p.Release();
^
mingw32-make[2]: *** [modules\videoio\CMakeFiles\opencv_videoio.dir\build.make:263: modules/videoio/CMakeFiles/opencv_videoio.dir/src/cap_msmf.cpp.obj] Error 1
mingw32-make[1]: *** [CMakeFiles\Makefile2:2506: modules/videoio/CMakeFiles/opencv_videoio.dir/all] Error 2
mingw32-make: *** [Makefile:162: all] Error 2
Hello Jean,
i am using OPENCV 4 which is latest using ECLIPSE.
i am done with the configure and generate using CMAKE.
But getting error when i run mingw32-make command.
I get mingw32-make *** all error 2 too. when mingw32-make is up to 65% and buinding detection_based_tracker. My mingw32 version is same as Jean’s, I unchecked Enable_Precompiles_header and CXX thing. My system is windows 7 64bit, and tried both 3.4.0, 3.3.0 … any suggestions? :<..
I know this article is over a year old now, but just in case anyone else has this issue, I figured I would post:
After downloading OpenCV 3.4 (note that 4.x versions tried did NOT work), I was able to get it to work with MinGW-w64 8.1.0 [g++ (x86_64-posix-seh-rev0, Built by MinGW-W64 project) 8.1.0].
However, I found the Eclipse setup showed “Cross Compiler” instead of GCC Compiler, and when I tried to build the project in Eclipse I got an error “Program ‘make’ not found in PATH” and the build fails.
In order to correct this, I had to go to Preferences >> C\C++ Build >> Tool Chain Editor >> Change Current toolchain to MinGW GCC.
See corresponding steps in this Stackoverflow for screenshots:
https://stackoverflow.com/questions/11579135/program-make-not-found-in-path/40727977
Hi Jean
I am at this step: “Inside opencv_src/Mingw_build type mingw32-make and hit enter”; I get the following error:
C:\mingw64\bin\windres.exe: unknown option — W
Usage: C:\mingw64\bin\windres.exe [option(s)] [input-file] [output-file]
The options are:
-i –input= Name input file
-o –output= Name output file
-J –input-format= Specify input format
-O –output-format= Specify output format
-F –target= Specify COFF target
–preprocessor= Program to use to preprocess rc file
–preprocessor-arg= Additional preprocessor argument
-I –include-dir= Include directory when preprocessing rc file
-D –define [=] Define SYM when preprocessing rc file
-U –undefine Undefine SYM when preprocessing rc file
-v –verbose Verbose – tells you what it’s doing
-c –codepage= Specify default codepage
-l –language= Set language when reading rc file
–use-temp-file Use a temporary file instead of popen to read
the preprocessor output
–no-use-temp-file Use popen (default)
-r Ignored for compatibility with rc
@ Read options from
-h –help Print this help message
-V –version Print version information
FORMAT is one of rc, res, or coff, and is deduced from the file name
extension if not specified. A single file name is an input file.
No input-file is stdin, default rc. No output-file is stdout, default rc.
C:\mingw64\bin\windres.exe: supported targets: pe-x86-64 pei-x86-64 pe-bigobj-x86-64 elf64-x86-64 elf64-l1om elf64-k1om pe-i386 pei-i386 elf32-i386 elf32-iamcu elf64-little elf64-big elf32-little elf32-big plugin srec symbolsrec verilog tekhex binary ihex
mingw32-make[2]: *** [modules\core\CMakeFiles\opencv_core.dir\build.make:1004: modules/core/CMakeFiles/opencv_core.dir/vs_version.rc.obj] Error 1
mingw32-make[1]: *** [CMakeFiles\Makefile2:2304: modules/core/CMakeFiles/opencv_core.dir/all] Error 2
Your help would be appreciated.
Joe