Recently I decided to update my OpenCV from 2.4 up to 3.2. I went through problems, and errors since am coding with C++ in Eclipse and using MinGW on Windows 10. After a little struggle, I finally got it running. Here is the step by step I used.
Table Of Content
UPDATE: The latest version of OpenCV is now 3.3, to stay up-to-date please access the newer version of this article here. If for some reason you still want the 3.2 guide, ignore this note and continue.
Getting started
– You will need:
- OpenCV source code directly from my GitHub repository (Forked from the official Github) or from official repository;
- Download and install MinGW;
- Download and install CMake.
Configuring OpenCV
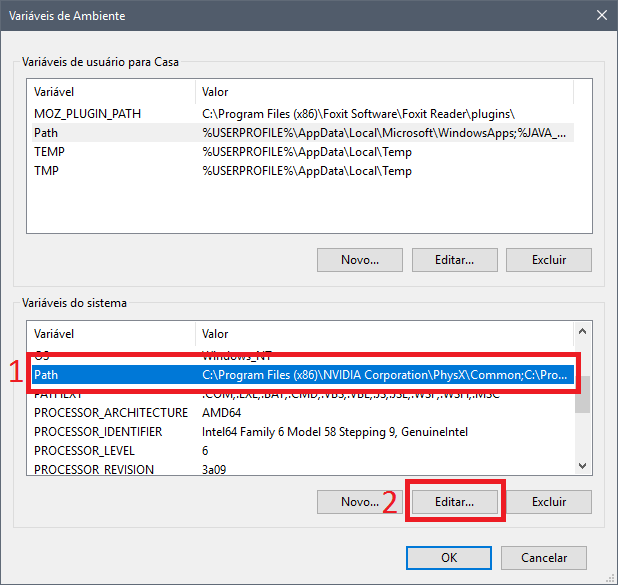
- Add MinGW to System Path
– Search for Environment variables;
– Click on Path, and Edit;
– Then, New, and add the address of your MinGW bin folder.
- Extract OpenCV to a folder, rename it
opencv_src
– Inside it, create a folder named
Mingw_build
Now, let’s compile OpenCV
- Open CMake-gui;
- set src folder as
opencv_src
and build folder as
opencv_src/Mingw_build/
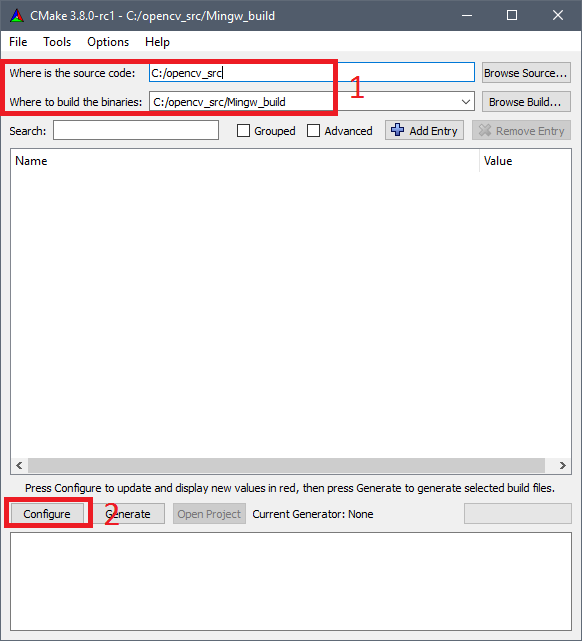
- Click on Configure, choosing
Eclipse CDT4 - MinGW MakeFile
in the next window, then next; - Wait for the entire configuration, then hit generate;
- Now, open the CMD, and navigate to
opencv_src/Mingw_build/ - Inside
opencv_src/Mingw_build
type
mingw32-make
and hit enter;
– This step probably will take a while, wait until it’s finished. - Install using
mingw32-make install - Finally, add
C:\opencv_src\Mingw_build\install\x86\mingw\bin
to your system path.
Configuring Eclipse
- Open it and create a C++ program using the following OpenCV example:
1 2 3 4 5 6 7 8 9 10 11 12 13 14 15 16 17 18 19 20 21 22 23 24 25 26 27 28 29 30 | #include <opencv2/core/core.hpp> #include <opencv2/highgui/highgui.hpp> #include <iostream> using namespace cv; using namespace std; int main( int argc, char** argv ) { if( argc != 2) { cout <<" Usage: display_image ImageToLoadAndDisplay" << endl; return -1; } Mat image; image = imread(argv[1], CV_LOAD_IMAGE_COLOR); // Read the file if(! image.data ) // Check for invalid input { cout << "Could not open or find the image" << std::endl ; return -1; } namedWindow( "Display window", WINDOW_AUTOSIZE );// Create a window for display. imshow( "Display window", image ); // Show our image inside it. waitKey(0); // Wait for a keystroke in the window return 0; } |
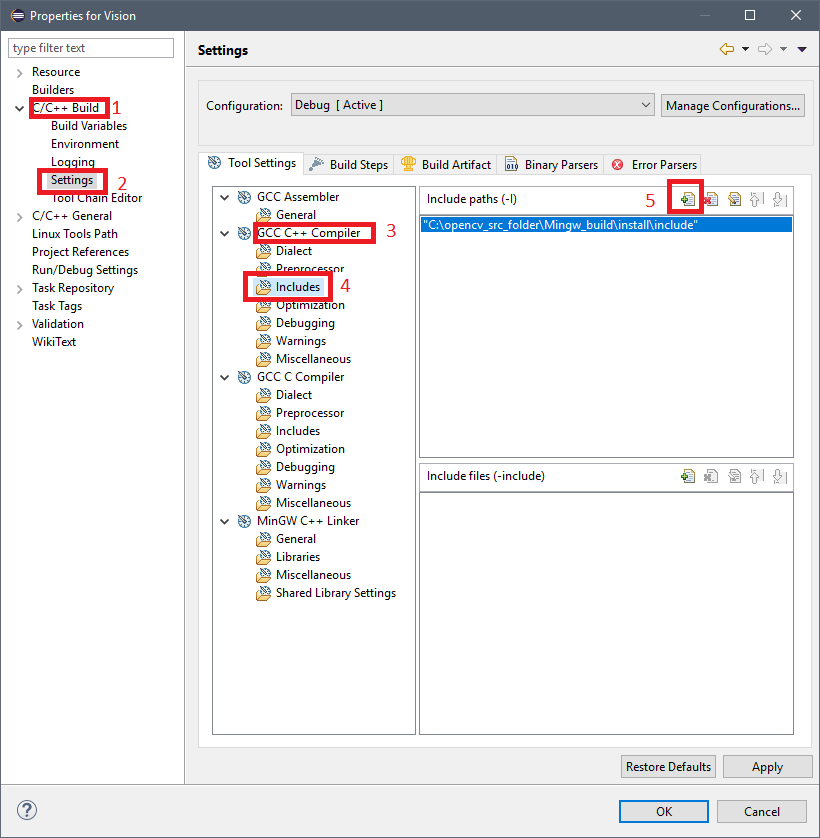
- Go to
Project > Properties > C/C++ Build > Settings > GCC C++ Compiler > Includes
and add the source OpenCV folder
C:\opencv_src\Mingw_build\install\include
- Go to
Project > Properties > C/C++ Build > Settings > MinGW C++ Linker > Libraries
, and add this to the Libraries (-l), separately as shown in the image
1 | opencv_calib3d320 opencv_core320 opencv_features2d320 opencv_flann320 opencv_highgui320 opencv_imgcodecs320 opencv_imgproc320 opencv_ml320 opencv_objdetect320 opencv_photo320 opencv_shape320 |
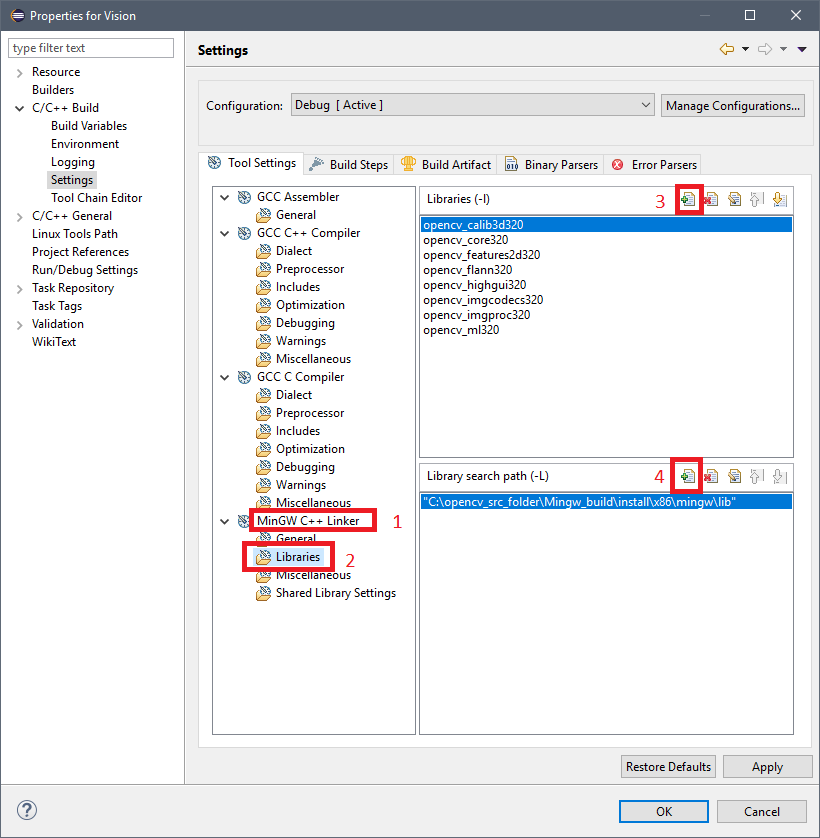
- You can add additional libraries from lib folder if you need, just follow the presented format;
- Add
C:\opencv_src\Mingw_build\install\x86\mingw\lib
to Library search path (-L); - Build the project. It will work flawlessly;
- The code and configuration files can be found here.
Have fun with your projects!
If this post helped you, please consider buying me a coffee 🙂


Hi,
My build is failing when i enter the command mingw32-make, I am unable to know the reason for the fail.
Could you help me out?
Steps i am done with:
Extracted OpenCV 3.4.0
from the Cmake GUI, I was able to configure and generate.
Hi.
Yes! Let’s work on that!
Could you show the error with a screenshot/message of the last 10 lines or so of your mingw32-make command?
Hi Jean,
I tried with Installing and configuring OPENCV3.4 steps which you have mentioned.
it started to work 🙂
Thanks a lot!!!
I’m glad it worked! Feel free to ask any questions you may have.
Hey Jean,
When I enter the command mingw32-make, after around 35% it fails and gives message of unknown error 🙁
Hi.
Could you show the error with a screenshot/message of the last 10 lines or so of your mingw32-make command?
part-1 https://drive.google.com/file/d/1xp4AsRNl1SAZao2DwePN8Po8ntx3qZcg/view?usp=sharing
errors continued in part -2
part-2 https://drive.google.com/file/d/1bvWZc2-WTAZg2gCk7vMjzyhzzu8lCkeC/view?usp=sharing
thanks
I tried code::blocks too but same error gets generated.
Seems to be something related to the OS version set by MinGW.
I suggest trying:
1- Find “commctrl.h” in MinGW directory and change
#define _WIN32_IE 0xSOMENUMBERto#define _WIN32_IE 0x0501OR
2 – Go to your OpenCV folder, find /modules/highgui/src/window_w32.cpp and add the green lines as showed here https://github.com/opencv/opencv/pull/3570/commits/1264be878547a2f7194f546f9e07589d1175a431
Good luck
Lemme try…. Will get back to you
Jean,
Both entries are already there in the files 🙁 I was going through various forums and got to know about following changes to be made in precomp.hpp in highgui which solve the error yet set up could not complete.
#if defined _WIN32 || defined WINCE
#if !defined _WIN32_WINNT
#ifdef HAVE_MSMF
#define _WIN32_WINNT 0x0600 // Windows Vista
#else
#define _WIN32_WINNT 0x0500 // Windows 2000
#endif
#endif
however now errors are here..
At global scope:
C:\opencv\sources\modules\highgui\src\window.cpp:552:37: error: ‘ButtonCallback’ has not been declared
C:\opencv\sources\modules\highgui\src\window.cpp:552:71: error: ‘int cv::createButton(const cv::String&, int, void*, int, bool)’ should have been declared inside ‘cv’
C:\opencv\sources\modules\highgui\src\window.cpp: In function ‘int cv::createButton(const cv::String&, int, void*, int, bool)’:
C:\opencv\sources\modules\highgui\src\window.cpp:552:5: warning: no previous declaration for ‘int cv::createButton(const cv::String&, int, void*, int, bool)’ [-Wmissing-declarations]
mingw32-make[2]: *** [modules/highgui/CMakeFiles/opencv_highgui.dir/src/window.cpp.obj] Error 1
mingw32-make[1]: *** [modules/highgui/CMakeFiles/opencv_highgui.dir/all] Error 2
mingw32-make: *** [all] Error 2
Have you already tried the updated version of this tutorial?
http://jeanvitor.com/cpp-opencv-windonws10-installing/
Or do you need specifically the 3.2 version?
i am trying to run the following code to access the web cam
#include
#include
#include
using namespace std;
using namespace cv;
int main(int argc, const char *argv[])
{
VideoCapture vid(0);
if(!vid.isOpened()){
cout<<"Camera could not load…"<<endl;
return -1;
}
namedWindow("webcam",CV_WINDOW_AUTOSIZE);
while(1){
Mat frame;
bool ctrl = vid.read(frame);
imshow("webcam",frame);
if(waitKey(0) == 27){
cout<<"The app is ended…"<<endl;
break;
}
}
return 0;
}
it failed with the following error, please help me in solving it
Description Resource Path Location Type
undefined reference to `cv::VideoCapture::~VideoCapture()' abcd.cpp /opencv line 10 C/C++ Problem
Hi,
Usually, this error is related to FFmpeg problems or you forgot to
#include "opencv2/videoio.hpp"and linkopencv_videoioI am using Windows 10 with eclipse oxygen.
While building,it shows configuration debug uses tool-chain mingw-gcc that is not supported on this system,attempting to build anyway.
Could you please suggest any alternative.
[…] My problem is that my program does not show in eclipse on windows for c++ when added imread function. I built the OpenCV step by step from here a website for source […]
Thank you! Merci beaucoup! Muchas gracias!
Hi, I tried installing ming32 -make on opencv directory but it is showing an error at 2%
[ 2%] Built target zlib
[ 2%] Building CXX object modules/core/CMakeFiles/opencv_core.dir/src/algorithm.cpp.obj
In file included from C:\Users\Prabha\Downloads\opencv\sources\modules\core\src\precomp.hpp:53:0,
from C:\Users\Prabha\Downloads\opencv\sources\modules\core\src\algorithm.cpp:43:
C:/Users/Prabha/Downloads/opencv/sources/modules/core/include/opencv2/core/utility.hpp:718:14: error: ‘recursive_mutex’ in namespace ‘std’ does not name a type
typedef std::recursive_mutex Mutex;
^~~~~~~~~~~~~~~
C:/Users/Prabha/Downloads/opencv/sources/modules/core/include/opencv2/core/utility.hpp:719:25: error: ‘Mutex’ is not a member of ‘cv’
typedef std::lock_guard AutoLock;
^~
C:/Users/Prabha/Downloads/opencv/sources/modules/core/include/opencv2/core/utility.hpp:719:25: error: ‘Mutex’ is not a member of ‘cv’
C:/Users/Prabha/Downloads/opencv/sources/modules/core/include/opencv2/core/utility.hpp:719:34: error: template argument 1 is invalid
typedef std::lock_guard AutoLock;
^
In file included from C:\Users\Prabha\Downloads\opencv\sources\modules\core\src\algorithm.cpp:43:0:
C:\Users\Prabha\Downloads\opencv\sources\modules\core\src\precomp.hpp:393:5: error: ‘Mutex’ in namespace ‘cv’ does not name a type
cv::Mutex& getInitializationMutex();
^~~~~
modules\core\CMakeFiles\opencv_core.dir\build.make:102: recipe for target ‘modules/core/CMakeFiles/opencv_core.dir/src/algorithm.cpp.obj’ failed
mingw32-make[2]: *** [modules/core/CMakeFiles/opencv_core.dir/src/algorithm.cpp.obj] Error 1
CMakeFiles\Makefile2:1853: recipe for target ‘modules/core/CMakeFiles/opencv_core.dir/all’ failed
mingw32-make[1]: *** [modules/core/CMakeFiles/opencv_core.dir/all] Error 2
Makefile:164: recipe for target ‘all’ failed
mingw32-make: *** [all] Error 2
Hello, can you show how to run open cv libraries in ARM based micro controllers(ARM_CORTEX-M4). I have SDK with Eclipse IDE, MinGW and python packages.
Please help me…..