
Last month I made a tutorial on how to build and install OpenCV 3.2 on Windows 10 using CMake and MinGW on Windows. Since then, I received some requests asking for a Linux equivalent one. So, here is the step-by-step.
Getting Started
- Start running the well known apt-get update and apt-get upgrade
Building and configuring Linux OpenCV
- After that, install the required dependencies by using the following commands;
1 2 3 | sudo apt-get install build-essential sudo apt-get install cmake git libgtk2.0-dev pkg-config libavcodec-dev libavformat-dev libswscale-dev sudo apt-get install qtbase5-dev python-dev python-numpy libtbb2 libtbb-dev libjpeg-dev libpng-dev libtiff-dev libjasper-dev libdc1394-22-dev |
- Download and extract the OpenCV source using the commands (you could change the version number to the one you want).
1 2 | sudo wget -O opencv.zip https://github.com/Itseez/opencv/archive/3.2.0.zip sudo unzip opencv.zip |
- Access the OpenCV folder and execute:
1 2 3 4 | mkdir build cd build cmake -D CMAKE_BUILD_TYPE=RELEASE -D CMAKE_INSTALL_PREFIX=/usr/local -D WITH_TBB=ON -D WITH_V4L=ON -D WITH_QT=ON -D WITH_OPENGL=ON .. make -j $(nproc) |
- And then install with: sudo make install
- Finish the installation creating the necessary link and cache to OpenCV library using:
1 2 | sudo /bin/bash -c 'echo "/usr/local/lib" > /etc/ld.so.conf.d/opencv.conf' sudo ldconfig |
- Now reboot. OpenCV is ready to use.
Eclipse configuration
- Open Eclipse and create a C++ program using the following OpenCV basic example:
1 2 3 4 5 6 7 8 9 10 11 12 13 14 15 16 17 18 19 20 21 22 23 24 25 26 27 28 29 30 | #include <opencv2/core/core.hpp> #include <opencv2/highgui/highgui.hpp> #include <iostream> using namespace cv; using namespace std; int main( int argc, char** argv ) { if( argc != 2) { cout <<" Usage: display_image ImageToLoadAndDisplay" << endl; return -1; } Mat image; image = imread(argv[1], CV_LOAD_IMAGE_COLOR); // Read the file if(! image.data ) // Check for invalid input { cout << "Could not open or find the image" << std::endl ; return -1; } namedWindow( "Display window", WINDOW_AUTOSIZE );// Create a window for display. imshow( "Display window", image ); // Show our image inside it. waitKey(0); // Wait for a keystroke in the window return 0; } |
- If you want to make sure where the OpenCV is, enter
pkg-config --cflags opencv
in the terminal to see where it is installed; - Probably, it will be at
/usr/local/include/opencv - Go to
Project > Properties > C/C++ Build > Settings > GCC C++ Compiler > Includes
and insert the OpenCV include path, as shown in the image.

- Go to
Project > Properties > C/C++ Build > Settings > GCC C++ Linker > Libraries
, and add this to the Libraries (-l), separately as shown in the image:
1 | opencv_core opencv_imgproc opencv_highgui opencv_ml opencv_video opencv_features2d opencv_calib3d opencv_objdetect opencv_contrib opencv_legacy opencv_flann |
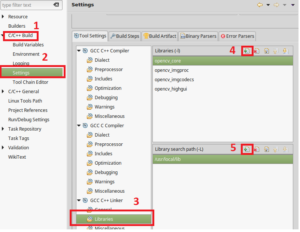
- Add the path to your libs folder on Library search path (-L);
- If you don’t know where it is, execute pkg-config --libs opencv
- Probably, will be /usr/local/lib
- Done! Build the project, and it’s finished.